Notes from learning to brew beer
This piece is primarily about the basics: What I learned starting up on all-grain brewing. I'll also cover why I chose an electric system, along with my key learnings about the particularities of the Grainfather G30 v3. At the end, you'll find a list of my supporting equipment with links to purchase. (I've been averaging one to two gadget purchases after each brew to make something about the experience easier).
Why I chose an electric brewing system
The main (and very simple) reason: It's really cold in the winter where I live and there's nowhere to run a big burner inside. The Grainfather lets me stay warm and brew in my laundry room. There are other benefits to be sure:
- Electric systems tend to be space efficient. The Grainfather has a small form factor for its 8 gallon capacity. I can easily stow it in a cabinet with all of my other brew supplies and return the laundry room to its non-brew lab state when I'm done.
- Electric systems automate temperature control during the mash and boil to keep you on your targets with much less hassle. The built-in pump to recirculate wort or transfer to your fermenter is super nice. Pretty much all of them have some type of grain basket that fits into the kettle, so you don't have to make or buy a separate mash tun and then store that somewhere.
Why did I buy the Grainfather specifically? Brand recognition, high materials quality, modular parts for easy replacement, and a feeling that, as one of the original electric brew systems (if not the original? I wasn't able to fact check this), they've probably worked out many common problems with the unit, especially in the G30 v3 model. I didn't conduct an in-depth comparison between the other electric offerings like the Anvil Foundry, Blichmann, Brewzilla, etc. But each of these have their champions.
Key learnings while getting started
This section will cover lessons learned both with the Grainfather and with homebrewing in general, particularly in fermentation and kegging.
Contents:
- Always stay ahead of the brew
- Mash temperature
- What is a yeast starter and do I need one?
- Dealing with the Grainfather pump
- Using the Grainfather counterflow wort chiller
- Calculating water volume
- Water treatment and brewing salts
- Boiling lid on vs. not
- Refresher on specific gravity and hydrometers
- Cold crashing
- Keg your beer
- Use anything other than a glass fermenter
- Keep your beer contamination-free with closed transfers
- Don't rush force carbonation
- Fermentation temperature control
- What do I do with all of this amazing beer I'm brewing?
Always stay ahead of the brew
I made many avoidable mistakes in my first brew session. One of those was not having a game plan. When I completed a step, I fumbled around to figure out what was next, which took a lot of time and made me feel panicky. Upon reflection, the experience reminded me of my old flight instructor's core tenet: Always stay ahead of the airplane. In other words, to have a safe and enjoyable flight, anticipate what's coming next and plan for it, rather than get behind and find yourself in crisis (which is pretty dangerous when you're piloting an aircraft). Applied to brewing, your whole day will go smoother if you are consistently ready for the next step. A few recommendations here:
- Have a mental model of the brew day. I read this book cover-to-cover several times to internalize the basic steps of all-grain brewing. It's a relaxing read and I liked the bits of British beer opinion and humor. Knowing the principles of a good brew lets you work quickly and move from one task to the next without having to go back and consult a manual or your recipe. If you're brewing with a Grainfather, watch Youtube videos of a brew day with that system specifically. Get to know your equipment!
- Input your recipe into the companion app. The Grainfather app does the basics well and you don't have to actually own Grainfather hardware to use it. While the experience of the application leaves something to be desired–pretty clunky and hard to find things–it removes a ton of thinking on your feet from the brew. It calculates water volume for you, lets you put in mash times, boil times, a hop schedule, water additions (i.e. brewing salts), and temperatures for every step.
- Clean as you go. A good way to lengthen the time of your brew day is to leave all of the cleaning to the end. Gunk tends to dry and crust onto your equipment, making it harder to remove if you leave it for long periods of time. I like to clean out the grain basket as soon as the sparge is complete. Easy to do by placing a trash bag over the top and upending it. You just have to fish out the grain plate when you're done. As soon as you're done chilling the wort down and transitioning it to a fermenter, wash out the main kettle and dump out the hop matter. It's easiest to do immediately.
Mash temperature. Why does it matter?
On my first brew, I halted conversion from starch to fermentable sugar because my temperature probe fell out of the thermowell and I didn’t notice. The Grainfather's controller thought the temperature of the wort was 68°F and blasted the heat on 100% to compensate. The wort spiked to 186°F around 30 mins in the mash, so my mash efficiency was very low, and I started with a much lower original gravity than the target on the recipe.
The article linked below gives a nice overview of the mash process. Your mash in temperature should generally sit between 149 and 153°F to maximize conversion of the starchy grain into sugars that yeast can consume.

What is a yeast starter and do I need one?
What is a starter? A way to culture more yeast cells to get a better fermentation when you pitch. You start a mini-fermentation process by pouring the contents of your yeast pack into a solution of something like dry malt extract and water to get it multiplying before it hits your wort on brew day. You usually make a starter for liquid yeast (since liquid yeast packs tend to have lower cell density than dry yeast ones) 24-48 hours before brewing. For dry yeast, there's a lot of debate over the benefits of "rehydration" but it is generally agreed that you don't make a starter with dry yeast.
Should you make a starter? When? It's a controversial topic (as with almost any part of brewing) among homebrewers. Here's what I do: I'll make starters for liquid yeast, especially if they've been in the fridge for a long time. This is because active cell counts decrease over time as the yeast slowly dies in the pack without new nutrients.
When creating a starter, I like to use these cans of pre-made wort, which I buy from MoreBeer! or Northern Brewer with my grain and hops for a batch. They make the process really easy. Pour one can into a saucepan, fill the empty can with water, pour the water into the saucepan, and heat. You want to get your starter wort solution close to or at boil and then quickly take it off the heat to prevent a boil over (which happens super easily with this sugary concoction). You boil the solution to sterilize it. Move your wort over to a sterilized 2000ml Erlenmeyer flask using a sterilized funnel (like this one). Foil the top of the flask to prevent contamination. Then, chill it all down in an ice bath. I take a large pot, fill it with ice from my freezer, add some water, and then drop in the flask. I use a sterilized instant read thermometer to check the temp. When the wort mixture is down to pitching temperature, I funnel in the liquid yeast (don't forget to sterilize the yeast bag with a few sprays of Star San solution). Drop in your stir bar, foil up the flask, and then place it onto your stir plate (like this one) for at least 24 hours before your brew.
On brew day, I usually pitch the entire flask into the chilled wort (usually around 1000-1500ml of solution), though some people like to cold crash the yeast starter–more on cold crashing below–and drain off the excess. I haven't noticed any weird flavors in my beer from my method.
When it comes to dry yeast, I haven't bothered to rehydrate it. I've had perfectly fine brews just directly pitching yeast sachets into the chilled wort.
A few other tips on yeast:
- Never freeze liquid yeast. Freezing destroys the hydrated cell walls and you'll get little to no performance out of a thawed liquid yeast pack. I always toss my liquid yeast into the fridge until I use it.
- Try to use liquid yeast in the first month that you have it. The sooner, the better performance you'll get.
- You can freeze dry yeast with little harm. Though, I tend to keep these packs in the fridge as well. They keep for a much longer time than liquid yeast.
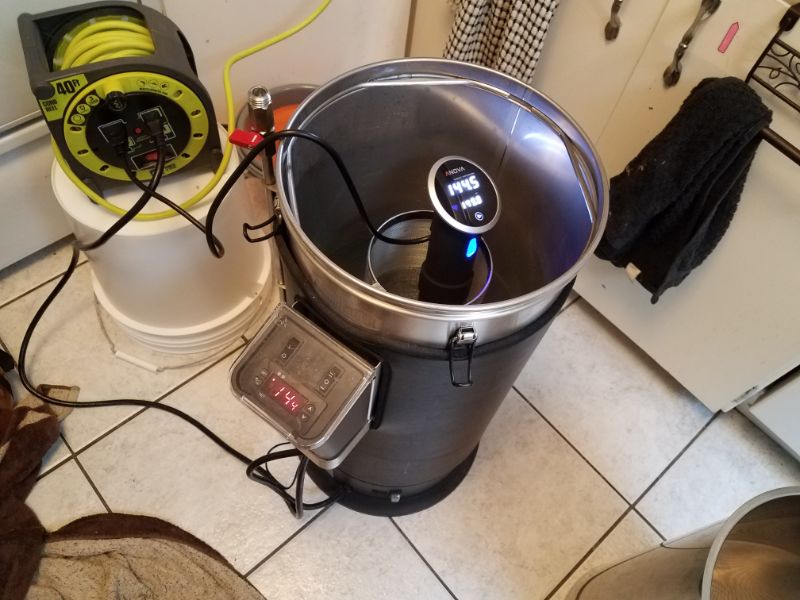
Dealing with the Grainfather pump
To me, this is the weakest part of the Grainfather G30 v3 experience. I’ve had a heck of a time with it. When the pump fails to push solution quickly (or at all), it makes it very hard to chill down hot wort or transfer the contents of your kettle to a fermenter. Having a high temperature for too long can cause any late hop additions to impart more bitterness than intended. And a lengthy transfer to a fermenter offers more opportunity for contamination.
During some brews with large grain and hop bills, I've had to backflow the pump 20-25 times to get things to flow at all. To backflow, simply turn the pump off and let the solution drain back down through the discharge pipe for 5-10 seconds, then start the pump back up. The aim here is to let the draining fluid push away particulates that might be blocking the pump filter. It rarely completely solves the flow rate problem though, or does for a short period of time.
A few recommendations if you're having pump problems:
- I ended up springing for the hop plate which adds another layer of filtration for debris over the pump filter. It's not a complete solution, however. I made a Pliny the Elder clone (massive hop bill) and I still faced persistent clogs.
- Get a hop spider for really hoppy beers. The drawback with the spider is that you have to diligently stir the contents to maximize hop contact with the solution to hit your target IBUs.
- Remove the ball and spring from the pump valve on the top of the discharge pipe. I don't like having to remove parts that I paid for, but doing this made an immediate difference for me. The ball and spring act as a safeguard against spraying liquid everywhere if you accidentally switch on the pump while the valve is open and you don't have the recirculation hose or the wort chiller attached. But this component is also another clog point where debris can get caught and reduce flow rate.
- For clog emergencies when all else fails, get syringes like this to blow air back down the pipe to the filter in a sanitary way. I'd not recommend using your mouth.
- Other people completely replace the pump with a stronger, third party one. I haven't gotten to that point yet.
Using the Grainfather counterflow wort chiller
Unlike the pump, this is an excellent part of the Grainfather kit. When you get a solid wort flow rate through the counterflow chiller, it brings down temperature at a blinding speed–noticeably faster than my old immersion chiller when I was extract brewing. Some tips:
- Clean and sanitize. Before my brew day, I like to run a hot PBW solution through the chiller using the Grainfather pump. Once I see flow through the tubing on the other side, I turn off the pump and let it sit there for 20-30 minutes to pull any residual gunk out of the inside. I then pump through a Star San solution for 30 seconds to a minute. It's really difficult to extract cleaning water from the chiller however. So, when I want to start chilling my wort, I run the chiller's hose into the sink (so I don't have cleaning water in my beer) and pump through just enough wort to push out the water until I see the color change. When this is complete, I put the hose back into the kettle and start chilling down.
- Use the chiller to transfer to your fermenter without a siphon (which is yet another vector for bacteria).
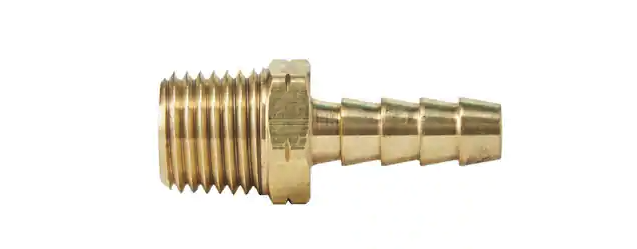
- I bought a barb at a hardware store to turn my sink nozzle into my cold water in, instead of running the garden hose in through a window.
Calculating water volume
Software is the way to go here. I don't even try to calculate water requirements by hand. Lots of homebrewers on Reddit recommend Brewfather, Beersmith, or Brewer's Friend, but I use Grainfather's software.
The Grainfather app makes strike and sparge water volume calculation super easy with the built-in calculator on the recipe creation screen in the app or a dedicated one on the calculators section. I always use the app recommendation for water volume.
If you're using a Grainfather, I would caution against using water calculations from recipes that weren't created by someone brewing on the same system. The water loss profiles can be completely different depending on the equipment. I recently made a beer where my original gravity number was way off because I chose not to use the app's recommendation and instead go with the recipe card's.
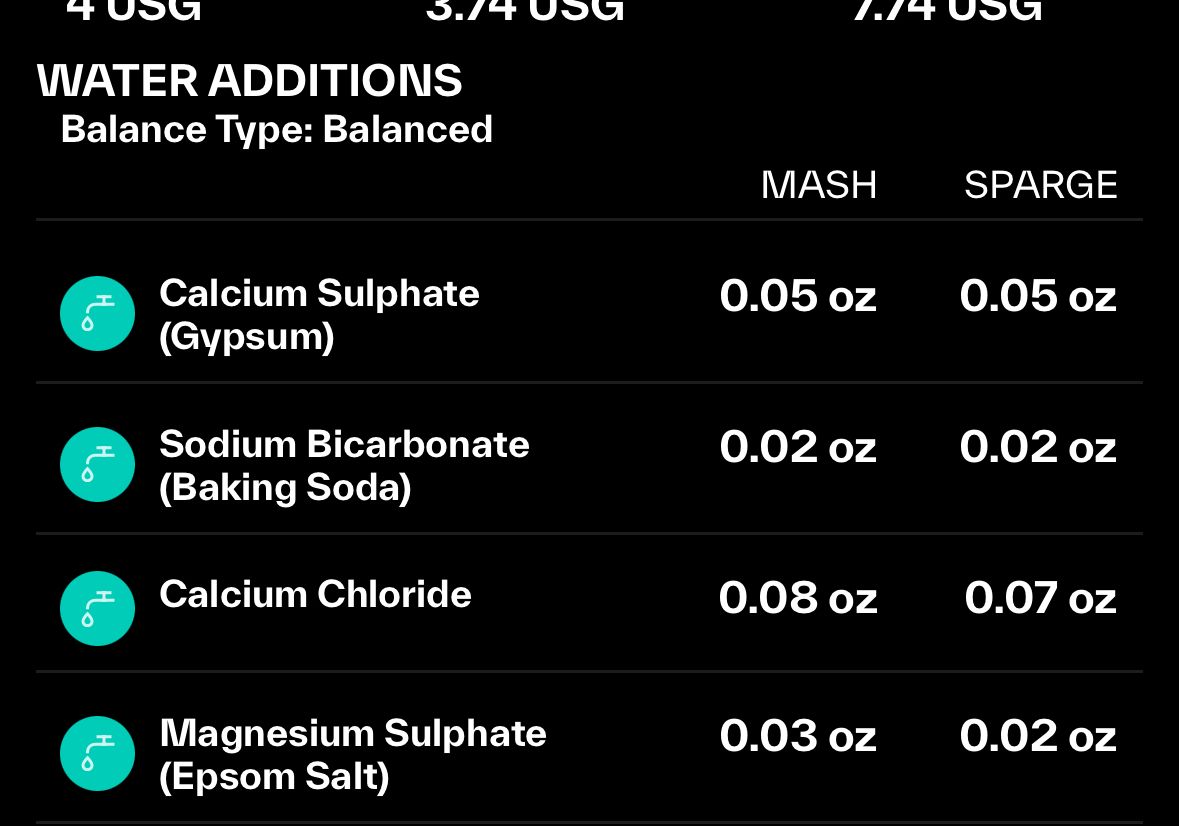
Water treatment and brewing salts
If you're trying to dial in a specific style, it's best to adjust the mineral content of the water you use to control the flavor and feel of your product. For example, West Coast IPAs call for a Sulphate-rich profile (which accentuates bitterness), and New England (Hazy) IPAs go heavier on Chloride (which increases the apparent sweetness and "fullness" of the beer). Using ordinary tap water is totally fine when you're starting out, but it may not be the right fit for your target style. This is a good intro to water chemistry in beer. And this is a great video on the subject.
It doesn't take a chemist's understanding of the principles and calculations at play here. I rely, again, on the Grainfather app to help me adjust my water. When you're building a recipe, there's a water calculator tool in the recipe screen that helps you adapt your source water to a target profile using various brewing salts for both your mash and sparge.
So what do I need to buy to control my water profile?
Distilled or RO (reverse osmosis) water and brewing salts. Distilled water is fairly cheap, so this is what I do. You use distilled water because it contains no mineral content and gives you a predictable, blank slate to work with. I'll usually get eight gallons at a time for five gallon batches.
You can use tap water in place of distilled and adjust it with salts, but I'd get a water report from your city and input these figures into your source water profile. The problem with water reports is that they can be out of date and not completely account for what you, the end user, draw out of your tap.
The key salts to buy are:
- Gypsum (Calcium Sulphate)
- Baking soda (Sodium Bicarbonate)
- Calcium Chloride
- Epsom Salt (Magnesium Sulphate)
I use the Grainfather app to adjust my water profile to a target style and then just add the recommended amounts to my strike water and to my sparge water pot before I get started on the brew.
Boiling lid on vs. not
It makes sense that you'd keep the lid on to retain more heat, but I learned that this isn't a good idea. I now boil lid off to vent away Dimethyl Sulfide (DMS). The DMS compound gets created went you heat wort. If too much of it stays in your beer, it creates a creamed corn off flavor. There's potential that it can get trapped into condensing water on the lid and fall back into the wort. I boiled lid-on for my first brew and I wasn’t able to taste DMS, but I just don't want to risk it in the future.
The official Grainfather recommendation is to boil with the lid off.
A refresher on gravity and hydrometers
Specific gravity is one of those absolutely key indicators in your brewing process. It's the ratio of the density of your wort/beer to regular water. In other words, it tells you how effective you were during your brew day in getting fermentables into solution (brewhouse efficiency). The specific gravity reading you take right before you transition the finished wort to your fermenter is called the Original Gravity (OG) reading.
OG is one of your beer vitals, along with ABV (Alcohol by Volume), IBU (International Bitterness Units), and SRM (Standard Reference Method --the beer color scale). You can closely estimate your ABV by taking the difference between OG and Final Gravity (FG)--which is the specific gravity reading at the end of fermentation.
Specific gravity answers several essential questions about your beer:
- Am I on target for my recipe? How much alcohol can I get by pitching yeast into this wort? If you're brewing a big, double IPA with a 9% ABV target, it's going to be impossible to achieve if you have an OG of 1.040. You're just going to have a very different beer than intended, and you can use this number to figure out where things went wrong (check what you did or didn't do during the mash).
- How much alcohol do I currently have and how is fermentation going? Just diff the OG and your current gravity reading to see the progress on alcohol production and how well your yeast is attenuating the sugars.
- Is fermentation complete? Rule of thumb is that if you have the same gravity reading for 2-3 days in a row, the fermentation is likely complete.
Measuring specific gravity requires a hydrometer or refractometer. The old school hydrometers like this are great to have around as a backstop, but I really recommend a floating hydrometer like the Tilt. The Tilt is one of the best adds you can make to your brewing setup because it tells you the gravity at any time without you having to draw beer out of the fermenter (both a contamination hazard and pain in the ass). It Bluetooths to your phone and integrates with the Grainfather app for live fermentation and temperature tracking. Very slick.
Cold crashing
What is cold crashing? It's when you chill your fermenter down to (ideally) just above freezing for at least 24 hours. This is usually done at terminal gravity. Cold crashing helps drop any excess yeast to the bottom of your fermenter into the trub and clarify your beer. I would particularly recommend doing this for beers that are supposed to be bright and clear before you keg or bottle.
How to cold crash? If you have the fridge space, just throw your fermenter in there at around 35°F. Or, if your garage stays above freezing and it's below 40-45°F, put it in there.
Be mindful of "suckback," however. Suckback is a natural consequence of cooling the air in the headroom of your fermenter. Cooling will cause the air inside to become more dense and outside air will flow in through the airlock to fill the excess volume if you don't do anything about it. This is not ideal especially for oxidation-sensitive beers like hazy IPAs. To prevent this:
- You can slightly pressurize your fermenter (e.g. 1 PSI) to counter the effect (this is easy to do with the Norcal Brewing Solutions pressure transfer system I talk about below)
- You can get a CO2 harvesting kit (link here) also from NBS that lets you capture CO2 from fermentation. This becomes the air that gets sucked back into the fermenter and you don't have to worry about it because it's sterile.
Keg your beer
After stepping up to all-grain brewing, the best way to upgrade your homebrew experience is to keg your beer. This is initially more expensive than bottling, but worth it if you're brewing a lot. Bottling is labor intensive and your carbonation levels at the end are often unpredictable. Buying bottles is an ongoing expense, and re-using bottles often means a lot of time spent scraping off the paper and glue. They are also hard to sterilize, especially if there's dried beer encrusting the insides of the glass.
Kegs, by contrast, are easy. They're simple to clean and sterilize. They only require a single transfer of beer from your fermenter. They produce predictable and measurable carbonation levels in your finished beer product.
All of these improvements aside, kegging is just cool. You get to show off your perfectly-carbonated, readily-accessible beer to your friends. My wife also loves the fact she can pour four ounces at a time without committing to twelve.
Key requirements:
- One or more Cornelius Kegs (most common form of homebrew keg, also known as Cornies). These have a 5-gallon capacity and look like this. The most common have ball lock connections and these are what I'd recommend.
- A kegerator, keezer, or other serving device with ball lock disconnects on the hose(s) that goes to the tap. How to make a kegerator.
- A CO2 tank
- Hose, hose clamps, and gray (for gas) ball lock disconnects for running CO2 into the keg
- A regulator for the CO2 into the keg
Some guidance:
Use anything other than a glass fermenter
The traditional homebrewing fermenter is a glass carboy. These are awful for several reasons:
- They are dangerous. Carboys are slippery and you have to buy all kinds of additional attachments or straps to carry them around. It's easy to drop them and lose hours of brewing work in a second. You'll also have a nice pile of sharp glass to clean up.
- They are super hard to clean. The neck at the top can't fit a hand, so you have to purchase strange, L-shaped brushes to scrub encrusted goop from the inside.
- It is difficult and un-hygienic to extract beer from them. If you're trying to take a gravity reading or transfer beer elsewhere, you have to use a siphon which is a contamination risk and also just a pain.
- It's very difficult to fit a mesh bag of dry hops in through the narrow neck.
- They don't have any hygiene advantages over plastic/metal fermenters. I've found it to be a myth that plastic fermenters scratch and harbor bacteria you can't get to. If you're using PBW and Star San to clean and sterilize, plastic works great.
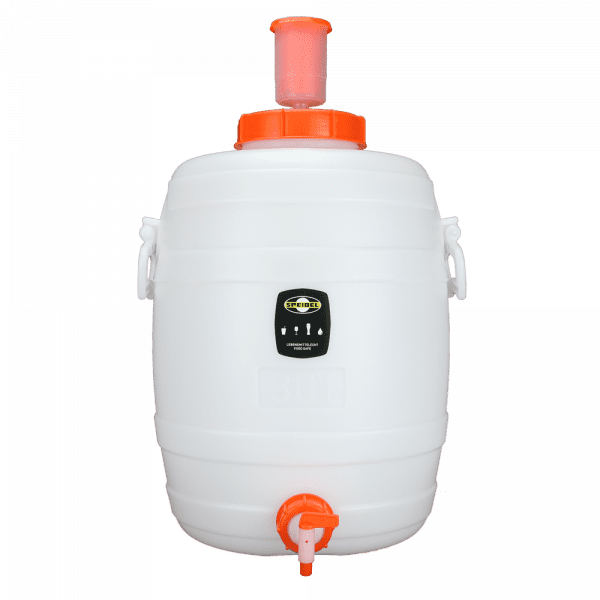
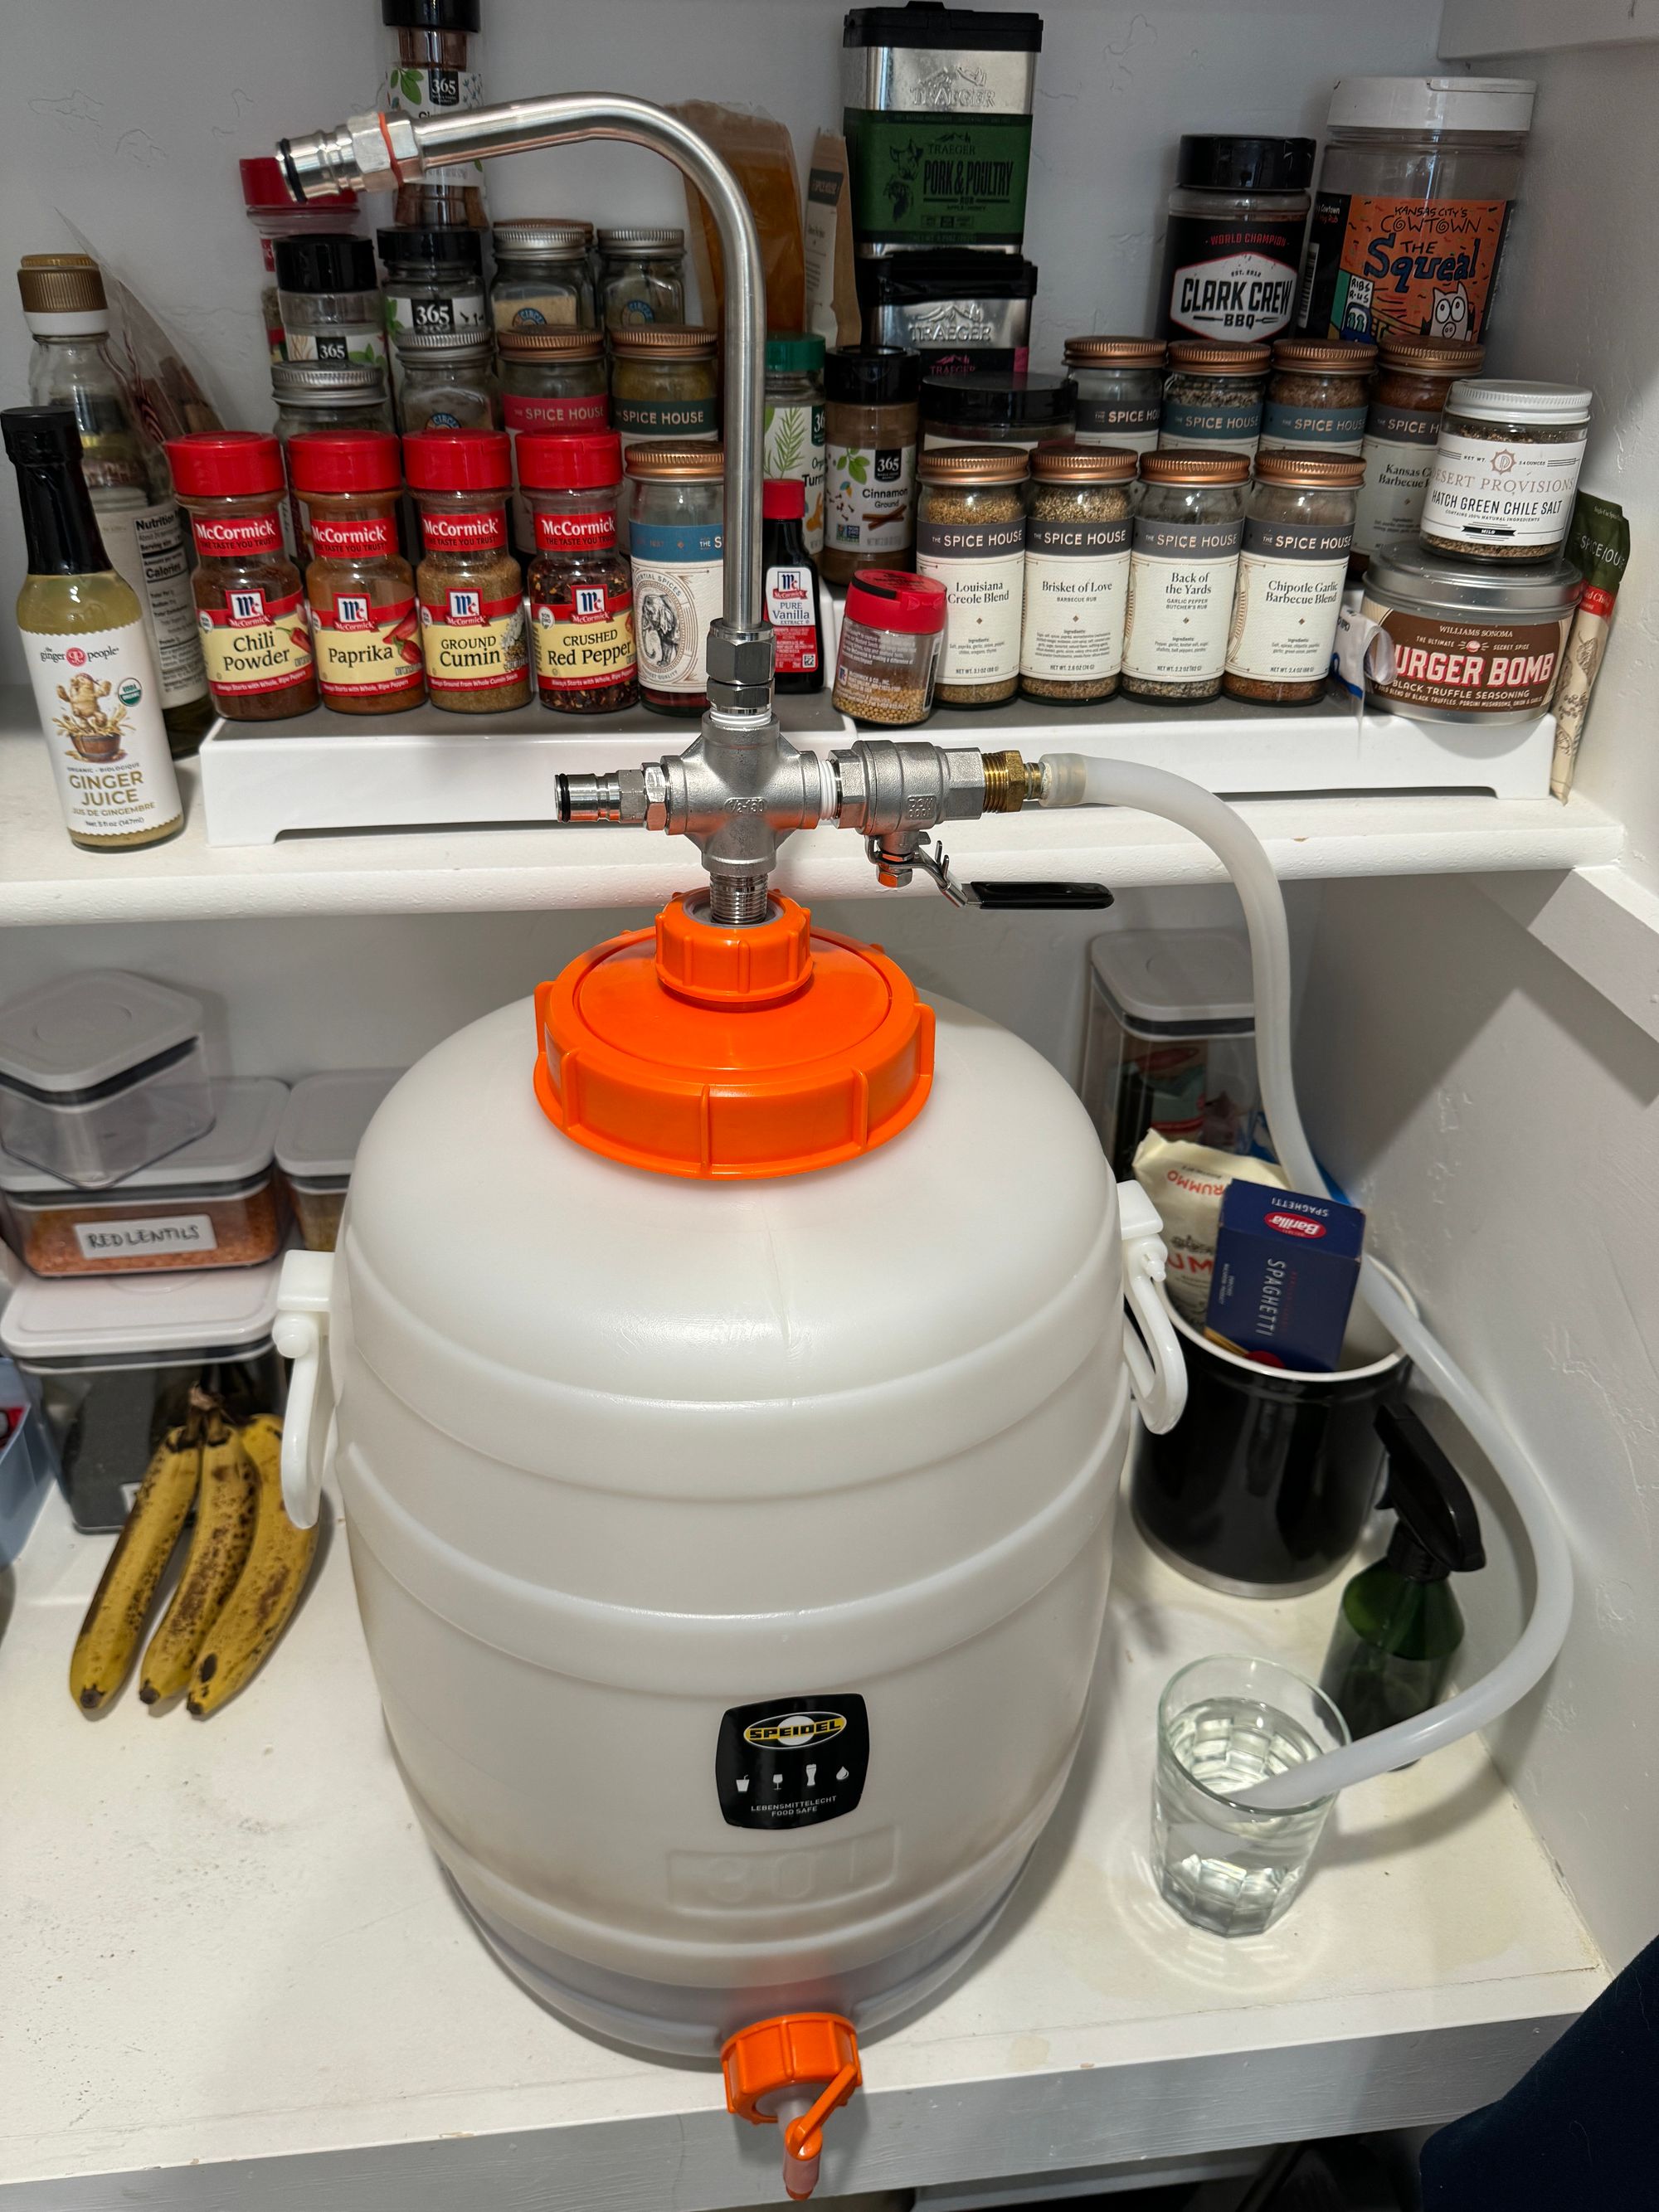
Recycle your carboys! Get a plastic or stainless steel fermenter. The old buckets are tried and true (though I'd get one with a spigot or install one yourself), but there are many other options.
A friend who runs a local brewery gave me a Speidel fermenter which changed the game for me. It has built-in handles, a wide lid at the top that lets you get in with your arm and scrub, a beefy airlock, and a spigot for easily drawing samples or transferring. I like the 7.9 gallon Speidel for 5-gallon brews because the extra headroom is nice for really foamy and active fermentations that would ordinarily blow off your airlock. They can also take some air pressure (more in the next section).
Keep your beer contamination-free with closed transfers
Good beer is about controlling the controllables. Reducing contact between your beer and outside air/oxygen as much as possible will minimize chances of infection and a bad final product. Closed transfers involve pushing beer from your fermenter to a secondary fermenter, or to a keg for final packaging without exposing it to the external environment.
There are many closed transfer systems out there that probably work with your fermentation setup, but I'll just walk through what I use with my Speidel. I found this device by Norcal Brewing Solutions to do closed transfers. It's beautifully simple. There's a racking cane that dips down into your fermenter to siphon beer upward, a ball valve for CO2 blowoff during fermentation, and ball lock disconnects to attach CO2 in and a beer out line to your keg. It fits onto most Speidel fermenters and uses the pre-existing Speidel fasteners to lock in with an airtight seal.

I have a spare CO2 bottle that I use to connect to the "in" post and then I push the beer using a very small amount of pressure inside of the Speidel. One note: I did have to wrap the threads with plumber's tape to seal off air leaks.
If it's working correctly, pressure should barely register on your regulator. All it takes is 1-2 PSI to push the beer. Ensure that you're consistently pulling the pressure release valve on your keg to let beer flow into the lower pressure environment. Pushing beer over will increase pressure in your keg gradually, so you have to continuously release air. Also make sure that you've closed off the CO2 blowoff valve.
The Norcal system is also great during fermentation, not just for transfers. If I'm dry hopping close to terminal gravity when the yeast is naturally producing less carbon dioxide, I like put in a cushion of CO2 (which is heavier than oxygen, your enemy) on top of the beer to protect it. I close the blowoff valve, ensure that nothing is connected to the racking cane, and then put in 1-2 PSI of CO2, and then open the blowoff valve to vent the excess pressure and mixed air. I do this a couple times to purge oxygen.
Instructional video from Norcal:
Don't rush force carbonation
I watched too many videos like this one ("carbonate your beer in 30 minutes") and tried to mimic the procedure. It does work, but I would not recommend it.
If you're trying to make a beer to fit a specific style, like an Altbier or a Bock, those styles all come with recommended carbonation levels (e.g. 2, 2.5, or 3 volumes). When you blast CO2 into a keg at 30 PSI and then roll it on the ground for a while, you lose all control over the amount of CO2 you're dissolving in. It's a crapshoot whether it'll come out right. It also foams your beer up like crazy. When I've done this in the past, the beer remained super foamy for the rest of the time I was serving it. I read somewhere that it's a lot easier to get CO2 into your beer than to get it out. Wise words.
I recommend the "set it and forget it" method. That is, set the recommended PSI (for me, usually around 12) for your uncarbonated beer to achieve a certain number of volumes. Then, leave it for as long as it takes to carbonate correctly, usually a week or so. No rolling the keg. Grainfather actually tries to give you a recommended PSI setting in the app to achieve a specific number of volumes depending on the beer style. Pretty cool.
Fermentation temperature control
Temperature control is one of the most critical ways to achieve predictable flavor and good beer in general. Certain yeasts and styles require specific temperature ranges. For example, it's best to ferment lagers around 50°F and then store them around 32°F for weeks or months (the actual lagering part).
As it is for many newer homebrewers, this wasn't a priority for me when I first started because I exclusively brewed ales. They tend to turn out pretty well fermenting at room temp. Based on the readings I get from my Tilt, my pantry is fairly steady around 67°F. But dialing in your temperature will level up your final product. A tightly controlled temperature range prevents the development of too many phenols and esters, which result in off-flavors.
There are many ways to control fermentation temperature, but the simplest to me seems to be to get an extra fridge or chest freezer and an Inkbird controller (linked below). Getting a used fridge off of Craigslist can be cost-effective and temperature management is hands-off (I don't want to have to refill tubs of ice for immersion chillers or jackets). Personally, I found that a chest freezer is the best option if you have the space. Chest freezers have more insulation and more room for storage. They're also pretty cheap, generally.
Temperature control method examples:
- Expensive: Glycol chillers. Example from Grainfather. Example from Ss Brewtech. Bear in mind you may also need accessory pumps and an adapter to your fermenter. Grainfather makes a separate (and expensive) conical fermenter that works out of the box with its glycol chiller.
- Mid-range: Fridge or freezer with external, adjustable temperature controller. Just make sure it's one that fits your fermenter. (Recommended if you're just starting out and you have the space).
- Cheaper: Cooling jackets or cooling rods (which dip into your beer).
What do I do with all of this amazing beer I'm brewing?
Submit to homebrew competitions! It's a chance to win street cred, medals, and receive feedback to make your craft better.
My current equipment list
Note: If you're reading this a while after the time of this writing (March of 2024), links may not work. I'll do my best to maintain this list. Also, I'm not an affiliate or in any way benefitting from these links.
- Grainfather G30 v3 [Link]
- G30 hop plate [Link]
- Kegco two-tap kegerator [Link]
- Hop spider [Link]
- 60ml syringe for GF pump back flow [Link]
- Speidel 30L fermenter (2) [Link]
- Inkbird temperature controller [Link] - Just plug your fridge/chest freezer into this and it will switch the compressor on and off to maintain temperature even above the typical fridge's advertised temperature range, e.g. 32°F-50°F. It's a wonderful piece of tech!
- Vissani 6.9 cubic foot chest freezer [Link] - This fits a 30L Speidel with room to spare. You can use it as overflow storage for Cornelius kegs when you're not fermenting
- Norcal Brewing Solutions Speidel blowoff tube + thermowell [Link] - I use this because the pressure transfer system with the tall racking cane doesn't fit in my freezer.
- Norcal Brewing Solutions CO2 harvesting system [Link] - I use this for my freezer to prevent any suckback problems when I'm chilling down beer for a cold crash. The air becomes more dense inside the fermenter and sucks in outside air to fill the void. This system lets you capture sterile CO2 from your fermentation and use this as the air that gets pulled back in during the crash, so you don't have to worry about contamination.
- Norcal Brewing Solutions Speidel pressure transfer system [Link] - I use this to transfer the beer to the keg when fermentation is complete. Just sanitize it well and then purge the vessel with CO2 before starting your transfer.
- Extra CO2 tank and regulator. It's super helpful to have an extra tank of CO2 for cleaning, pressure transfers, and other operations outside of your kegerator. I'd also highly recommend a dual body regulator like this one to let you carbonate two kegs at different volumes or to serve one while carbonating another.
- Refractometer [Link] – For gravity readings during the mash and boil
- Tilt Hydrometer [Link] – For gravity and temperature readings during fermentation
- Gallon jug for sparging [Link]
- Stainless steel funnel [Link] – Lots of different uses, but good for pitching yeast or other ingredients into narrow gaps, like the necks of Erlenmeyer flasks
- Wooden mash paddle – To not scratch the Grainfather stainless [Link]
- 5-gallon corny kegs (3) [Link]
- Big canister of PBW [Link] – Use this for your first phase of cleaning. I like to soak tubing, my brew kettle, and fermenters in a PBW solution (best if heated to 140°F) to dislodge anything caked on.
- Big jug of Star San [Link] – Use this for your second phase of cleaning to sterilize equipment after getting all gunk off. Star San is really cool because it's safe on beer and you in small quantities. "Don't fear the foam," is a common phrase you'll see around the homebrewing internet. You don't have to rinse the residual foam from Star San out of your kegs and fermenters (it doesn't impart much or any detectable flavor), which makes it really versatile. I like to fill a small spray bottle with a Star San solution and quickly sterilize tools or spigots before use with my beer.
- 2000ml Erlenmeyer flask [Link]
- Clawhammer Supply stir plate/stir bar [Link]
- 5-gallon pot for sparge water heating/part cleaning [Link]
- Nylon mesh bags for dry hopping (4) [Link]
Other good sources
- Grainfather tips
 Travieso