On learning to fly, part II

Continued from part one “Aviation as craft and continuous improvement.” Below is a list of my most important lessons-learned while I fumbled my way to a Private Pilot certificate.
1. Complete a ground-school curriculum and pass the FAA written exam before any serious flight training.
Getting acquainted academically with aerodynamics, weather, airport markings, flight procedures, instruments and so forth made the actual practice of flight much more familiar for me when I finally started in earnest. Plus, having all of that ground school and the written exam out of the way lets you actually focus on flight training when you get to it. I found the ground schooling to be a serious time commitment because of the sheer volume of material you need to internalize for the test.
The thing to know about the written exam is that the FAA pulls from a standard pool of questions. Most online ground schools will give you tests that use the exact wording from the question bank. If you do it right, you shouldn’t see a question on the FAA written exam that really surprises you. They may change a few of the parameters or details of a given question, but there’s a standard format.
To practice, I found tons of useful pre-made flash cards sets on Quizlet like this one.
2. Start by getting to know your training plane inside and out.
Buy a hard copy of the Pilot’s Operating Handbook (POH). This will come in handy throughout your training and on your checkride. Since the practical test is open-book, examiners will gladly let you peruse it and I often found it faster and less clumsy than attempting to pull up the PDF on my iPad.
- I found this series from Embry Riddle on Youtube to be immensely helpful for understanding the basics of the Cessna 172.
- Be able to name every doohickey that sticks out of the plane. Examiners love to point at random things protruding from the wings or fuselage and ask you “what’s that and what does it do?” Things like the pitot tube, static port, auto-pilot static port, ELT antenna, GPS pucks, comms/nav antennas, etc. This is a great little reference.
- You’ll be asked to use all or most of the avionics in the plane during the practical test, so time invested learning those up front is well-spent. The key things to learn first: How to tune frequencies on the radio, how to use the GPS if you have one (be able to go “direct to” an airport code or find the nearest airport for a diversion), and how to use the ADSB-In (if you have one) to monitor other air traffic in your vicinity. If you can use those systems, you’ve covered ~90% of what you’ll need to know for an exam.
3. Drill radio calls to learn them by heart.
One of the most intimidating things for me starting out was talking to air traffic control (ATC). There’s a lot of jargon involved and brevity is critical. There are three basic calls to master first if you train like I did at a towered airport.
- Call ground to taxi. “San Carlos Ground [who you’re talking to], Cessna 290TW [who you are], Fly Bay Area parking [where you are] ready for taxi to the runup, Oracle departure [what you want], with information alpha. [ATIS code]”
- Call tower for takeoff clearance. “San Carlos Tower, Cessna 290TW, runway 30 runup, ready for departure.”
- Call tower for re-entering the airspace. “San Carlos Tower, Cessna 290TW, Coyote Hills 2000 [where you are and your altitude], inbound full stop with alpha.”
I would practice them on my drive over to the field.
If you mess up or forget what to say next, know that you can always say “standby,” collect your thoughts, and then make the call again. This happened to me a ton when I’d forget the ATIS code.
4. Get an iPad Mini, a yoke mount, and pay for the standard version of ForeFlight.
With the G1000-equipped planes this is probably less critical since you have traffic and a moving map on the multifunction display , but if you’re flying a “steam gauge” Cessna like I was, having an iPad mounted to the yoke as a nav aid and VFR chart reference was immeasurably helpful. I didn’t really know that this was such a hack until I failed my first attempt at a pre-solo stage check with the flight school owner. I was all over the place. I didn’t have my paper charts in the front seat with me (forgot them in my backpack). I wasn’t writing down any of the ATC instructions and would forget small details like the altimeter setting reported in the ATIS. He would ask me how high I could go before hitting the bravo airspace above us in our vicinity and I couldn’t remember. It all made me flustered and discombobulated. Not great.
I recommend getting the iPad Mini because of space reasons. The bigger iPads are pretty bulky in the cockpit of the Cessna 172 (even more so in the 152) and impede your view of important things like the RPM gauge. Plus, the Mini is cheaper.
ForeFlight is hands-down the best flight-assistance technology I came across during my Private Pilot training. If you’re unfamiliar, there’s a good walkthrough here, but, generally, it’s an app that provides:
- Maps of all kinds (VFR, IFR).
- A digital scratch pad for ATIS readouts and ATC instructions (which can often be long and have lots of numbers in them — like frequencies and squawk codes for flight following). I just use my finger to write stuff on the fly here.
- A place to house common documents related to your flight. I created a folder called “Checkride” for all of the charts, airport diagrams and so forth that I needed for test day. Supremely helpful.
- Flight planning tools. They make cross-country planning a total breeze compared to writing navlogs by hand and it’s much more precise than an E6B “whizwheel.”
- Weather information and briefings.
- Flight plan filing and activation.
- Airport information at a tap (airport diagrams, frequencies, runway lengths, pattern information, local winds, etc.).
- Time, distance, fuel estimations.
- A heck of a lot more I probably don’t even know about.
It’s used by civilians and militaries alike around the world. In case it’s not obvious, I’m a huge fan.
Having ForeFlight ready on the iPad in front of you is a massive boost for your situational awareness. I found it cool that it connected to the wifi signal emitted by the plane’s L3 transponder and I could project other live traffic and my own location all on one screen. It makes navigation a cinch. In general, err on the side of whatever reduces your task load as a pilot, it’s safest that way.
I purchased this yoke mount.
5. Hammer the pattern early in your training to fly the coveted “first solo.”
To clear you to fly by yourself, instructors need to make sure you can safely take off and land and that’s about it. Your radio calls should be passable, but they don’t have to be perfect. Performance maneuvers mostly come later (although you should know what a stall feels like and how to avoid one in the pattern — essentially, don’t fly around with a weird nose-up attitude or load up the wings in turns when you’re only 1,000ft AGL). So, a few tips for mastering the pattern:
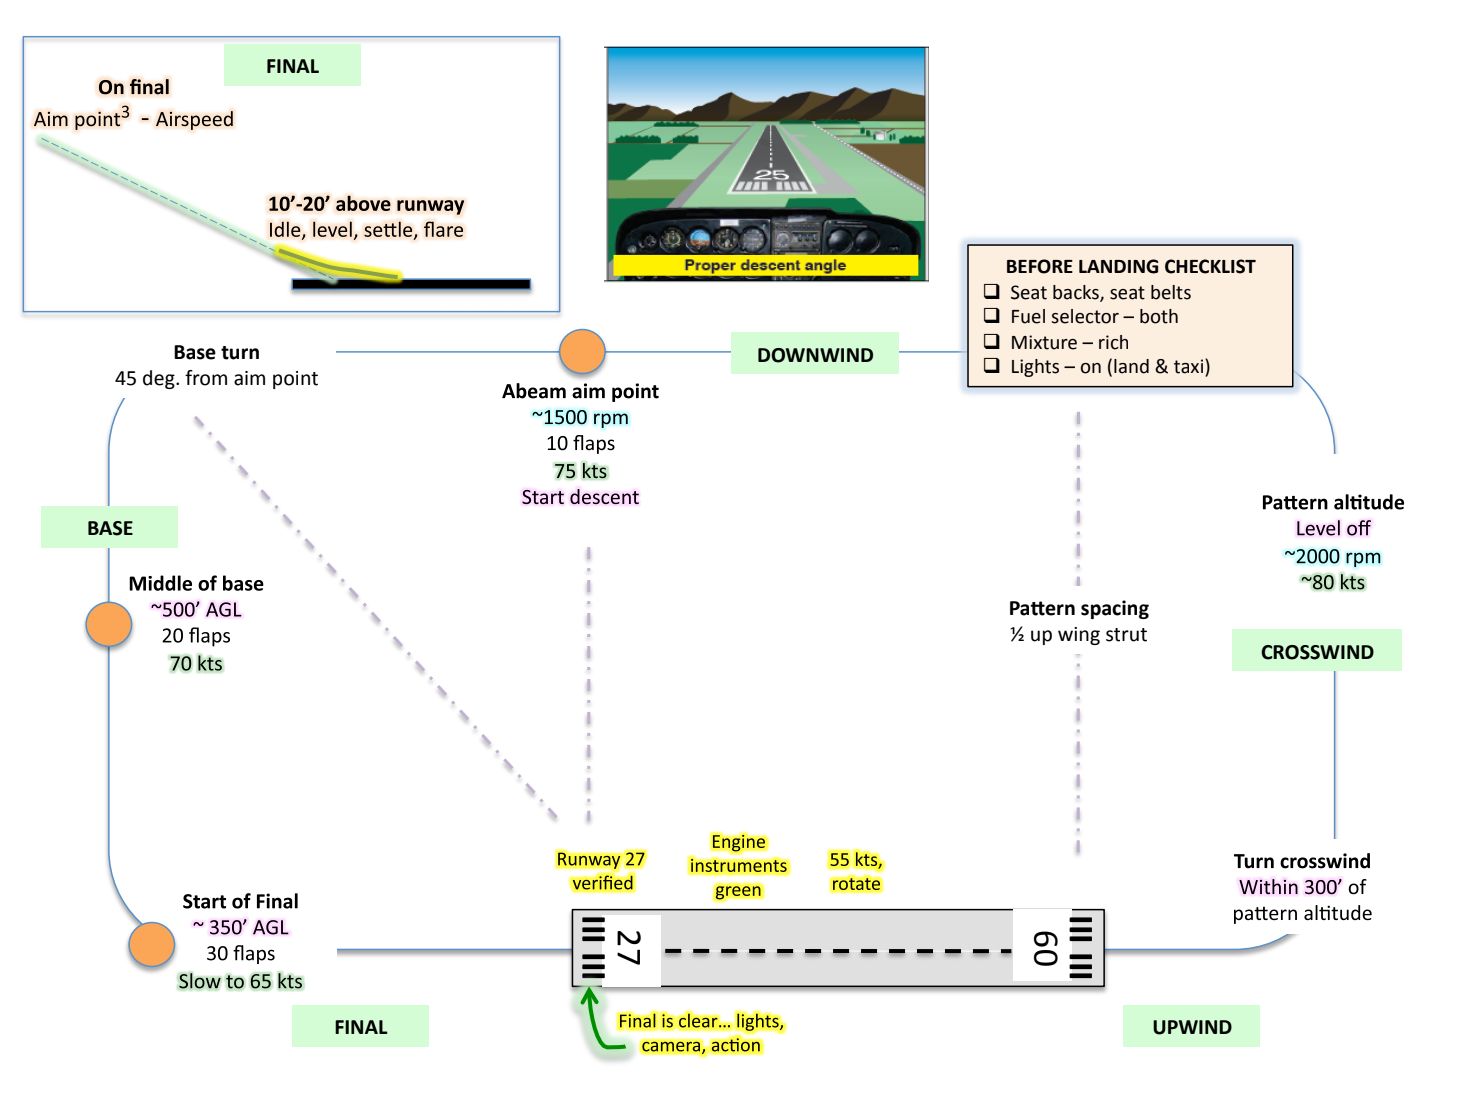
- Develop the sight-picture for a good landing profile (illustrated below). Get a sense of what “high” and “low” feel like by asking your instructor to demo those.
- Airspeed is king. Drill crossing the threshold at 65 knots (Cessna 172) or equivalent for your aircraft. Other than keeping centerline and the longitudinal axis of the plane straight down the runway, airspeed is the critical component of the landing. It's what determines your floatiness in the flare. Too much and you float all the way down the runway and have to go around. Too little, say 5–8 knots slow, and you can’t really flare and you land harder.
- Practice flaring by just not letting the plane land. You don’t have to do anything crazy with the nose, just hold it about level with the horizon. One of my instructors would practice this with me and we’d count the seconds I was holding off the wheels from touching at an idle power setting just above the runway. We’d always aim for about six to eight. Flaring in this way when done well sets the plane down nice and easy. A good demo of this.
- One of the first things my instructor had me do was memorize the diagram below and “chair fly” it (sit in your home office chair, close your eyes, and go through the motions as you would in the aircraft). It really helps.
- Practice this as many times as necessary in the simulator if you have one, more on that below.
- Schedule “pattern flights” with your instructor outside of the syllabus and go to an uncontrolled field for touch and goes. Do 10–15 normal landings and call it a day. A few days like that and you’ll be sticking landings routinely and developing your “feel.”
6. Pepper “flying blitzes” into your training as often as you can manage.
At about ten-month mark, I was frustrated with my slow progress through the syllabus. I targeted two flights per week, but averaged fewer with vacations and time out of town. So, I tacked on two vacation days to Memorial Day weekend and flew for five consecutive days (my first “blitz”), busting out all of my cross-country and most of my night-flying in the process. This changed the game. My skills and confidence as a pilot skyrocketed with so much time behind the yoke packed into that short window.
Since flight and instructor hours drive your cost, the more of those you use to learn the required maneuvers or knowledge, the pricier your certificate will be. The tested way to reduce the number of hours to hit each milestone, such as your first solo or first solo cross-country, is to fly more often and condense your learning.
7. Use sims to nail flows and maneuvers.
Use Microsoft Flight Simulator (MFS) and the sim at your flight school if they have one. There’s a good reason both the military and civilian airlines fully train pilots in simulators. These days, they’re incredibly realistic and cost-effective. A friend of mine at Skywest didn’t touch a real Embraer until his first flight with passengers!
While a home-built sim with MFS is much lower fidelity than those used to train commercial pilots (which have fake cockpits made to the exact specifications of actual aircraft), training on your PC works wonders for learning maneuvers. If you can swing it, I’d recommend grabbing a USB yoke, throttle, and rudder pedals. It’s a whole lot cheaper (and pretty transferrable to the real world) to practice stalls, steep turns, landings, realistic emergencies etc. at home than in the air.
There are also amazing plugins for MFS. This is a walkthrough to connect your virtual flight to ForeFlight.
The yoke, throttle, rudder pedals pack I purchased.
8. Rack up all the style points you can on the checkride before you start the test.
You have to know your stuff, but the best way to get the examiner “on your side” psychologically and rooting for you is to show up looking prepared and ready with all required documentation. If you win them over, they may (possibly) look the other way if you trip the line on any airman certification standards…
Tips for test day:
- Make sure your documents are totally in order and you have them all with you: Student pilot certificate, medical, government photo ID. I keep everything in a plastic folder with dividers in it.
- Bring your aircraft’s maintenance logs and make sure you go through it with your instructor beforehand and identify all of the relevant annual and 100 hour inspection entries. Know how to prove your airplane is airworthy when asked!
- Bring a current terminal area chart and VFR sectional for your locale
- Bring your logbook and tab your night and cross-country flights. This and following bullets have a theme: Tabs = style points.
- Bring a current FAR/AIM that looks a little dog-eared. Make sure that you tab frequently-referenced regulations. I tabbed many of the same sections detailed in this post.
- Bring the POH hard copy and tab out the emergencies sections (engine fire, engine power loss, etc.) as well as fuel and electrical diagrams.
- Bring your iPad with ForeFlight and all documents related to the flight that the examiner had you plan in a special folder (airport diagrams, chart supplements — make sure to have bookmarks in the AFD for any hotspots in the airport diagrams at hand)
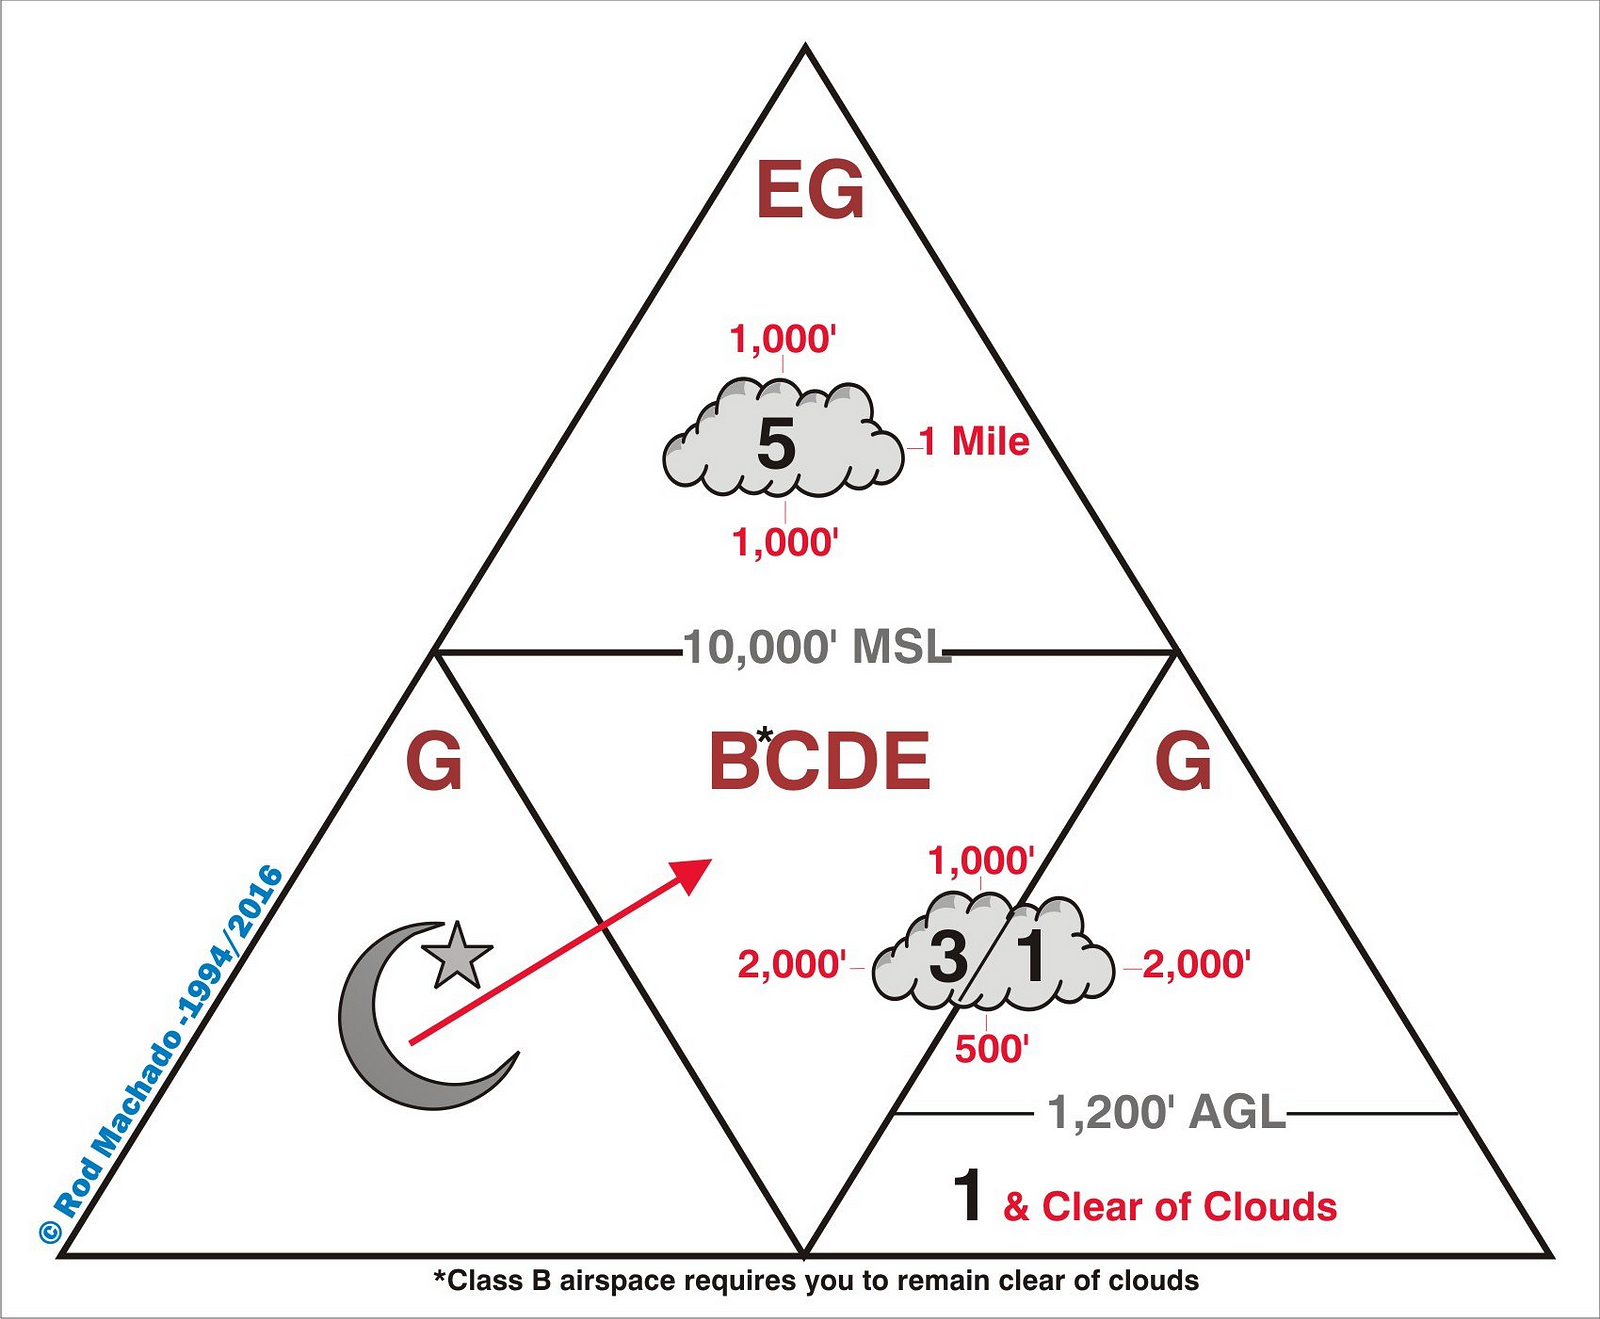
- Use the “airspace triangle” to memorize all of the cloud clearance and visibility requirements for each type of airspace. This one was super helpful for me.
- Get re-endorsed for solo in a way that supersedes any flight school limitations. My school’s standard solo policy had explicit prohibitions against touch and goes. So, my examiner made it very clear that I would fail immediately if I tried to do a touch and go and my latest endorsement said I couldn’t. I got a new one right before test day that stipulated my only limitation was 8 statute miles of visibility at home field.
- Eat a full meal beforehand.
- No alcohol in the preceding two days.
- Make sure you get 8+ hours of sleep on each of the preceding two nights.
In conclusion
This was one of the most grueling but worthwhile endeavors I’ve taken up in my life. The biggest reward for snagging your Private Pilot certificate, other than being able to fly yourself to cool places, is that you always have a card in your wallet that reminds you that you’re a total badass. It signifies that you can overcome hardship, stick to difficult pursuits, and face your fears.
Please don’t hesitate to reach out to me if any of the above advice is unclear, or if you feel like I missed something big. Thanks for reading!